
5 DIY Lighting Projects You Need to Try
5 DIY Lighting Projects You Need to Try
Even your favorite lighting shops with hundreds or even thousands of fixtures may not have exactly what you are looking for. They may have pendant lights, barn lights, and wall sconces, but do they have the specific type of lighting you wish to have that go beyond just ceiling, floor, table, and wall lighting? Do they have the exact elements you want?
If you want illumination to bring a wow factor into your interior or exterior design that no other light fixture will offer, considering opting for a DIY project to design your fixture exactly as you want it, customizing the size and colors to your space.
1. Wine Bottle Light
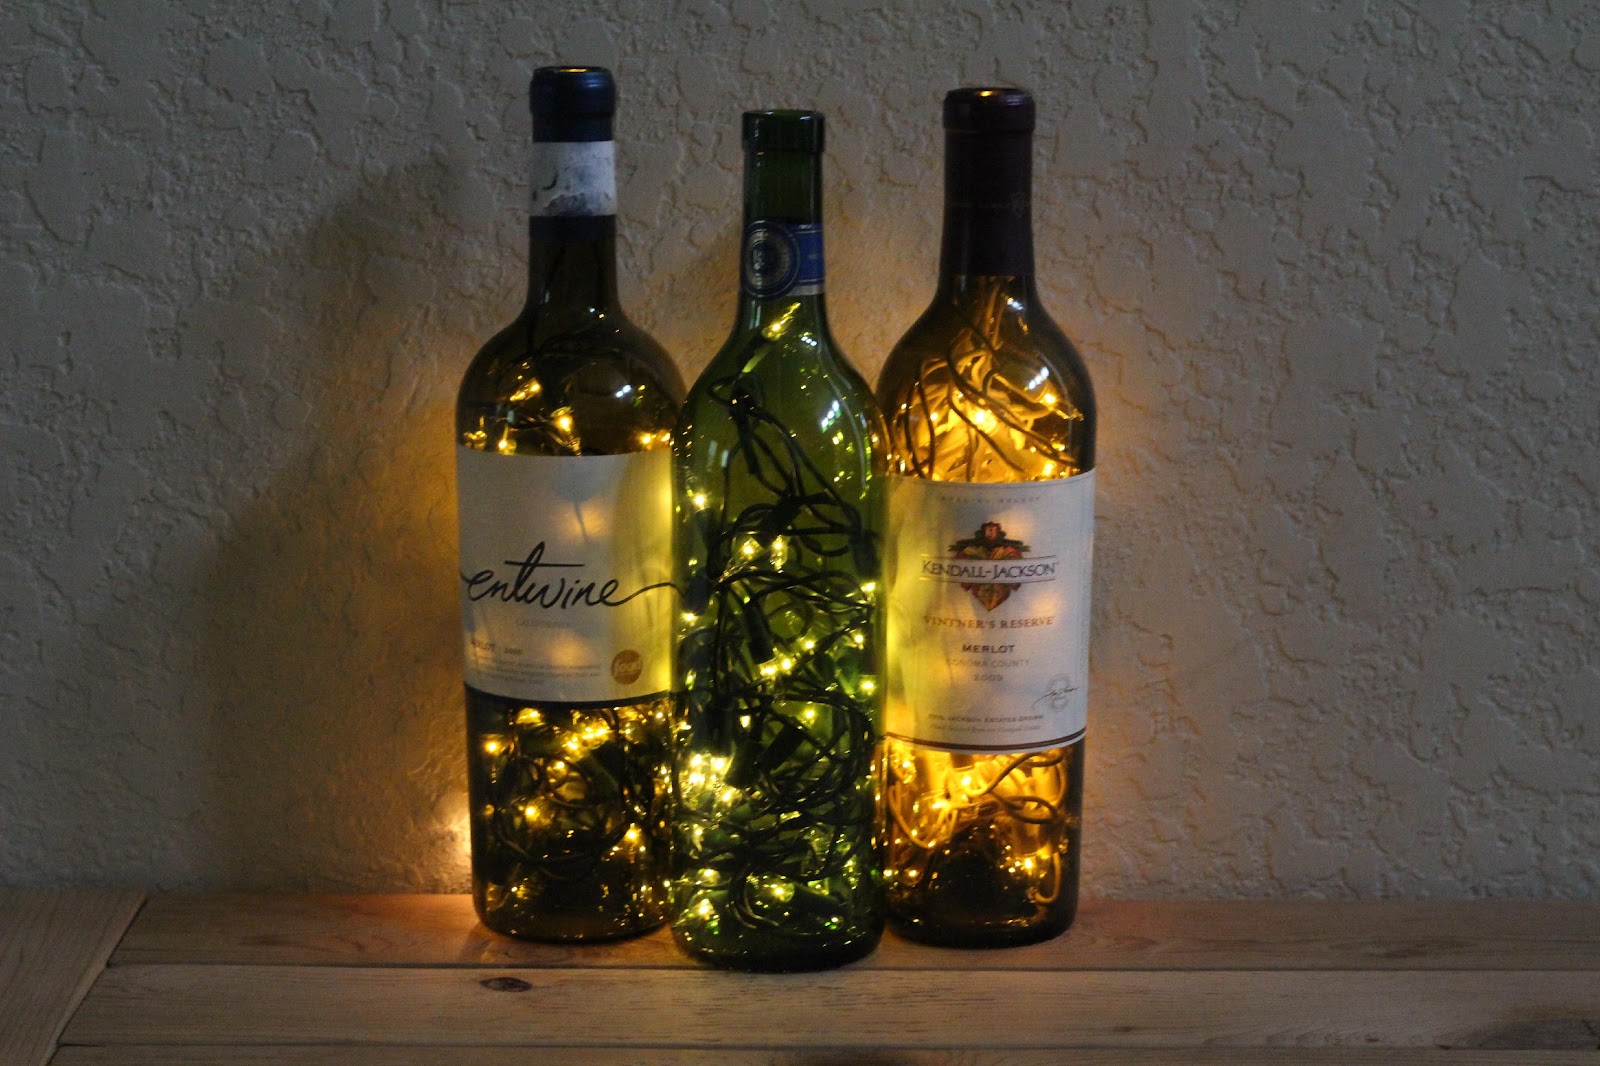
The first DIY project we have is very simple yet elegant for any space. This Wine Bottle Light project is from Wit & Whistle and can be done by lighting newbies of all ages!
What you’ll need:
- Empty wine bottle
- Safety glasses
- Gloves
- Masking tape
- Drill
- ½ inch drill bit
- Short strand of stringed lights with a plug on just one end
How to do it:
- Rinse out an empty wine bottle thoroughly and let air dry.
- Place a strip of masking tape to mark where you’d like to drill a hole into your bottle (for the stringed light’s cord to hang out). Masking tape will help keep the drill bit in place when you go to drill the hole.
- With gloves and safety glasses on, beginning drilling the hole in the designated spot. Pour out or rinse out any glass bits from your bottle.
- From the hole you drilled, begin to carefully place your stringed lights into the clean bottle, keeping the plug hanging out of the hole.
- Plug into the wall to light up your bottle.
2. Hemp String Pendant Lights

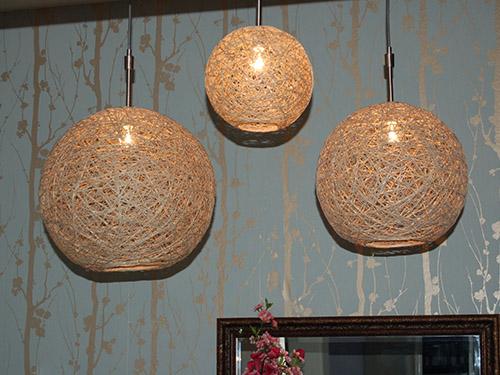
If pendant lights are your thing, try out this neat (and simple) DIY lighting project from Homedit. (Hint: If you don’t like the bland color choice used in the above picture, you can opt for different colors!)
What you’ll need:
- Bouncy balls of different sizes
- Hemp string
- Clear-drying craft glue
- Plastic gloves
- Permanent marker
- Needle
- Lighting hardware
How to do it:
- Start with one bouncy ball, wrapping hemp string around it in the way you like and occasionally adding craft glue to allow your hemp string to stay in place.
- After the glue dries, take your needle and pop the ball, leaving you just with the skeleton of the hemp string. You now have your lamp shade!
- The trickiest part of this DIY is up next: install your shade with the right lighting hardware.
- Repeat the process with different bouncy balls to make more light fixtures (if you wish). Opt for different fixture neck sizes like in the image above if you’d like.
3. Coffee Filter Snowball Wall Light
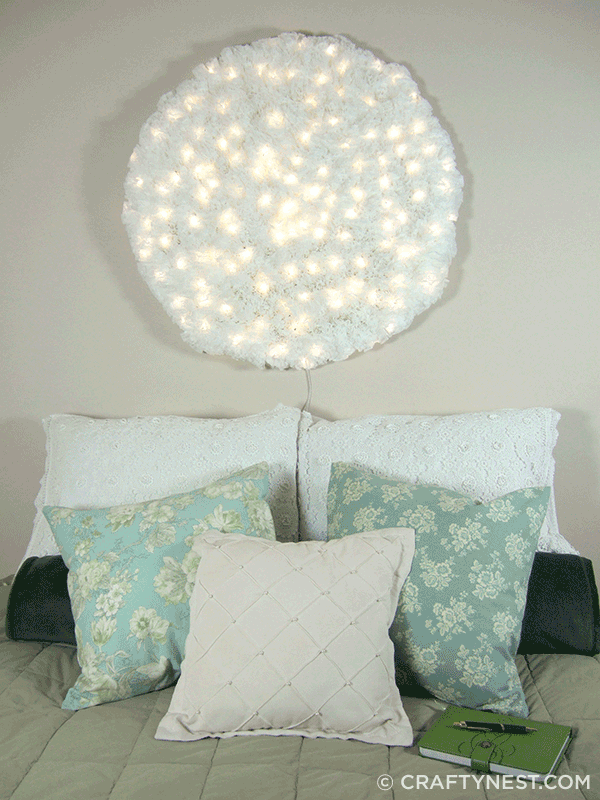
The next DIY project you may be interested in – especially for a bedroom setting – is this cute Coffee Filter Snowball Wall Light from Crafty Nest. This project is simple to moderate on the scale of easiness, but it is more time-consuming.
What you’ll need:
- 400+ basket-style coffee filters
- Stapler with 200+ staples
- ½ inch, 3-foot wide hardware cloth
- String of LED lights (with at least 100 bulbs)
- Wire cutters
- 4-inch plastic cable ties
- Wall hook
- Heavy-duty scissors
- Circle grid PDF print-out
- Drop cloth or newspaper (optional)
How to do it:
- To keep your workspace clean and spiffy, place your drop cloth or newspaper on the area you will be working.
- Download and print the circle grid PDF if you want to make your fixture approximately 28-inches in diameter. Following the pattern, use wire cutters or tin snips to cut your hardware cloth 60 x 60 squares wide and tall (28” x 28”).
- As you’re cutting your hardware cloth, any squares on the edges should be cut in half to make your cloth circular in shape.
- On an outer edge of your circle, secure the end of your string lights with a cable tie to your frame.
- Continue to wrap around your string lights around your circle, fasting it to your circle every few inches or so. Then begin towards the center of the circle in a spiral pattern.
- Take a clean coffee filter and place your finger in the center of its opening, wrapping it around your finger tightly. Crimp the tip after you remove your finger.
- In every other square on your circle grid, place two of your crimped coffee filter “flowers” into the same square in a crossed pattern and staple them in place. Start on the outer edge of your circle and work your way into the center.
- Install your wall hook where you’d like to hang your fixture and hang up your new wall light!
4. Doily Petal Lighted Flower Bouquet

If you need a touch of illumination in your space, consider creating this colorful and beautiful Doily Petal Lighted Flower Bouquet from Saved by Love Creations. It’s great to place on a nightstand, coffee table, dining table, side table, bathroom or kitchen counter, dresser, or wedding table.
What you’ll need:
- Bottle or vase
- LED branch
- Heavy-duty craft paper (different colors)
- EK Tools doily petal punch
- YouTube video for guidance
How to do it:
- For this project, you will only need to construct the flowers; everything else is store-bought. So, start by following this YouTube video to construct your doily flowers.
- When you are finished making your flowers, you’re already almost finished! Take your bottle or vase and place your LED branch in it. Then place each one of your flowers onto the bulbs of several of your LED branches lights.
5. Watercolor Herringbone Lamp Base
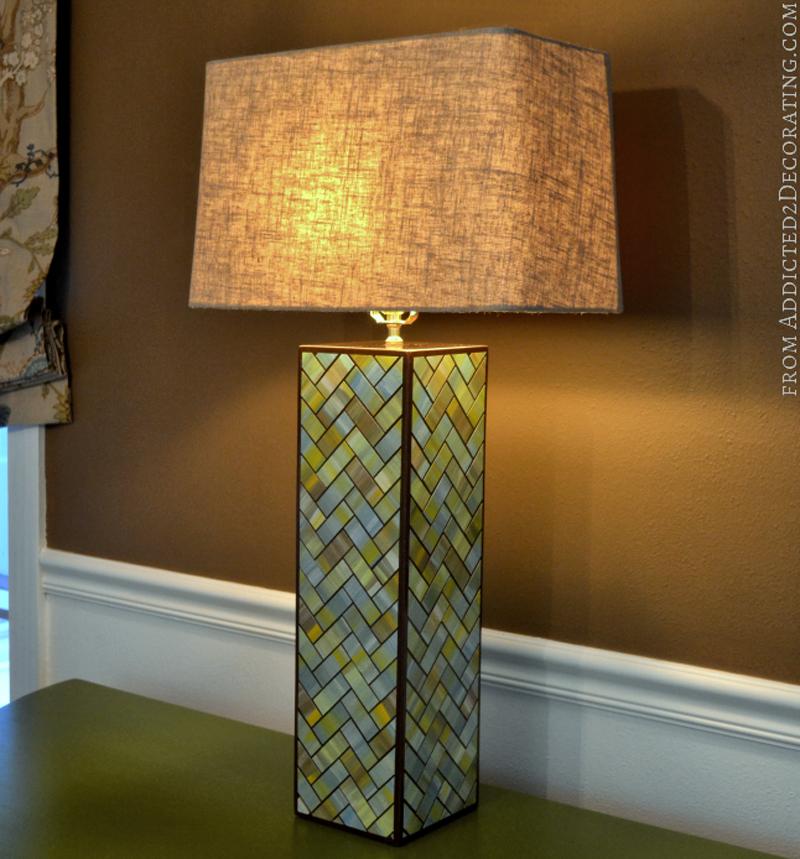
In this last DIY lighting project we have for you, brought to you by Addicted 2 Decorating, you’ll just be working with the lamp base from scratch. It’s more on the time-consuming side and isn’t the simplest of DIY projects, but the results are stunning.
What you’ll need:
- Circular saw
- Razor blade
- Tape measure
- Paint brush
- MDF
- Wood glue
- Nail gun
- Wood filer
- Watercolor paper (several pages, approximately 18” x 24”)
- Sandpaper
- Paint (colors of your choice)
- Mod Podge
How to do it:
- The project suggests that you create your own lamp base from scratch. That said, you can learn how to construct your own wood base here.
- Once you have your rectangular lamp base ready, you’ll be painting on watercolor paper lines or waves in the colors of your choice. Create multiple of these paintings. Let them air dry overnight.
- Cut your paintings into ¾ inch-wide strips, 2 inches long.
- With Mod Podge, you’ll be glue each your watercolor strips in a herringbone pattern on each side of your lampshade and using a razor blade to cut off the parts of the paper that hang over the edge.
- For the full details (this one is pretty long; you’ll have to see the tutorial images too), check out the project here.
Conclusion
Partaking in DIY lighting projects is a great way to get creative, have fun, and add revamped illumination to your space with the exact materials, colors, designs, sizes, and textures you’d like your light fixtures to offer in your space.
However, DIY projects are not for everybody. Some can be very affordable while other projects can be costly and time-consuming.
Regardless of the route you choose, it’s a wise idea to scope out ready-made light fixtures from Cocoweb.com before you consider making or designing fixtures from scratch. We offer thousands of light fixtures with LED lighting with different sizes, colors, styles, materials, and technology in forms ranging from picture lights to table lamps and barn lights. Who knows, maybe you’ll find a piece you really love!
In the end, opt for the illumination you love aesthetically and need function-wise.
Recent Posts
-

How to Light a Gallery Wall at Home
A gallery wall done well is one of the most impactful design moves you can make. A collection of fra …4th Jun 2026 -

How to Care for Your Cocoweb LED Picture Light: Essential Tips for Plug-In, Hardwired, Direct Wire, and Rechargeable Options
A great art light doesn’t just illuminate—it enhances your space and highlights your artwork’s true …19th May 2026 -

The Evolution of Lighting: Edison to LED Innovations
Imagine trying to read your favorite book, cook a meal, or navigate your home using only the faint, …24th Apr 2026